Tuesday, December 18, 2012

Hoisin Glazed Salmon


Salmons are rich in Omega-3 fatty acids which is a healthy fat for heart health. It is also a fatty acid that is important for brain and eye development. We are fortunate to live in a country where this fish is abundant and pretty affordable. Salmons, like any other kind of seafood, do not require hours of cooking in the kitchen. In this hoisin glazed salmon recipe, you need no less than 20 minutes cooking time and 4 ingredients. If you are a type of person who likes less than 5 ingredients type of cooking, I am confident this is the one for you. 

Hoisin is a Chinese sauce made with fermented soybeans. It is sweet, umami and quite addictive. It is used commonly in Chinese cooking but also used as a dipping sauce for Vietnamese fresh rice rolls. You can purchase Hoisin sauce in any grocery stores. See below for the recipe and may you enjoy this Omega-3 laden fish in your diet!

Skill Level: Easy
Serves: 2

INGREDIENTS:
  • 2 salmon steaks
  • 2 tbsp hoisin sauce and another tablespoon for brushing
  • Pinch of salt
  • Black pepper
  • Toasted sesame seeds (optional)
  •  
METHOD: 
  1. Marinate the salmon steaks with 2 tbsp hoisin sauce, salt and pepper. Leave for 10 minutes
  2. Heat up oven to 350 degree Fahrenheit and bake the salmon steaks for 10 to 12 minutes. For every 5 minutes, brush the steaks with 1 tbsp hoisin sauce 
  3. Once cooked, sprinkle with toasted sesame seeds
Note: Cooking time for salmon can be vary, depending on the thickness of the steaks. Adjust accordingly. Once cooked, fish should flake easily with a fork

Saturday, December 8, 2012

Beetroot Poriyal


Beets - Much as I love the vibrant colour of this vegetable, I have never liked beets. And as one who does not give up easily on food, I always try it whenever it served and my conclusion was always the same - it tastes like mud. "And how often does she eat mud?" you might well ask, not ever really, but beets taste like earth, unlike potatoes and other root vegetables. Last year when we visited some friends they served a beet salad with goat's cheese and a light vinaigrette; I tried it, much to the surprise of all who know me and pronounced it a hit.
Recently my mum made this beet poriyal which I enjoyed just as much. To celebrate this culinary turning point in my life, let me share this dish which is a great accompaniment to rice and protein. Poriyal means a stir fry with spices and oil which is cooked until you get the desired texture. No water is added to this.

Skill Level: Easy
Serves: 4 - 6 
 
INGREDIENTS:
  • 4 medium sized beets peeled and cubed
  • 2 medium sized onions chopped fine
  • 1 green chili sliced (more if you prefer a spicier dish)
  • 2 T cooking oil
  • 1/2 tsp cumin seeds
  • salt to taste
  • 1/4 tsp turmeric
  • 10 curry leaves


 METHOD: 
  1. Heat oil in a skillet
  2. Add cumin seeds and saute for a couple of seconds until fragrant, add onions and curry leaves, saute until transparent
  3. Add cubed (raw) beets, chili, turmeric and salt
  4. Cover and cook on low heat for 8-10 minutes stirring occasionally until it is cooked to the desired consistency

Sunday, November 25, 2012

Jerk Chicken - Slow Cooker Version


There are 2 kitchenwares that I cannot live without. First and foremost, a slow-cooker. The later is a pressure cooker. These cookwares are so handy and they save me time in the kitchen. If you have a slow cooker and think it's hidden somewhere collecting dust in your basement or attic...well, it's time for you to take it out! 

Ever imagine what would happen if you throw in chicken marinated in jerk seasoning in a slow cooker? Well, I actually did couple of days ago! I let the chicken with its marinade simmer in a slow cooker for 4 hours and the results: moist, juicy and fall-off-the-bone meat that simply melts in your mouth. Furthermore, the sauce is full of robust flavours: a perfect balance of thyme and Jamaican all spice.  I serve the chicken with  our Jamaican Style Rice N' Peas. For left over chicken, I simply shred the meat and make into a jerk chicken sandwich with cabbage coleslaw for lunch. Perfect for a cold weather lunch that certainly warms up your tummy! 

Check out the link for our Jerk Chicken recipe.

Friday, November 16, 2012

Paneer and Vegetable Rice


Rice is a revered grain in all of Asia. In India it is referred to as “Prana”- The breath of life - and is often the first solid food given to a baby. It features prominently at Hindu weddings, symbolizing wealth, abundance, fertility and prosperity; puffed rice is the last food put into the mouth of a deceased person, believed to feed the soul on its journey. This staple plays a role in religious ceremonies and celebrations, and sustains, employs and provides a source of trade for much of Asia. China and India are two of the largest producers and consumers of rice in the world. Cultivated for centuries, today, rice is grown on every continent except Antarctica.

The versatility of this modest grain demands respect; it graces the tables of the wealthy as well as humble homes too poor to afford much else. Rice preparations are diverse enough to satisfy breakfast, lunch, snack and dinner options. Few grains can boast being made into food (risotto, fried rice), beverages (rice wine, rice milk), and clothing. This grass cereal contains complex carbohydrates, no fat or sodium and is a source of protein. It is gluten free, easy to cook and provides a delicate, nutritious option for infants or people with digestive disorders. Of the brown and white varieties, the former is more nutrient dense with a higher vitamin, mineral and fibre content, while the latter is relatively inexpensive and can be stored indefinitely.

Rice features prominently in Asian cuisine. There are several varieties of rice, this recipe uses the basmati variety. My mother says, “Rice grains should be long and graceful, standing close like siblings, but never stuck together, and the trick is in pre-soaking the rice.” 

Skill Level: Easy
Serves: 4 -6

INGREDIENTS:
  • 1 packet of paneer (available at most grocery stores) 
  • 2 cups of boiling water with 1-2 tsp of salt to soak paneer 
  • 4-5 Tbsp of cooking oil to fry paneer
  • 20 green beans cut into small pieces
  • 1 large red onion sliced
  • 1 large carrot cut into small cubes
  • 1 large red bell pepper cut into small pieces
  • 1/2 a cup of frozen corn
  • 2 Tbsp cooking oil to saute vegetables
  • 2 cups of basmati rice
  • 1 Tbsp of ghee (clarified butter) substitute w/ 1/2 Tbsp butter and 1 Tbsp oil
  • 2 cups of boiling water
  • salt to taste


METHOD:

Mixed vegetables with paneer
  1. Cut all the vegetables into similar sized pieces
  2. Add oil to a skillet and sauté onions until golden, add carrots and when cooked, add beans, corn and lastly the red pepper. Set aside
  3. Cut paneer into cubes, add it to a bowl of salted boiling water let it stand for 15 minutes. (this step can be omitted if you are trying to reduce salt) 
  4. Add oil to a pan and fry the paneer until the edges turn golden, drain with a slotted spoon and add it to the mixed vegetables. Season to taste
Rice
  1. Drain all the water from the rice, heat a pan (with a well fitting lid), add ghee and   rice until all the grains are coated with oil. Add salt to taste
  2. Add 2 cups of boiling water 
  3. Cover, set heat to medium and allow to cook for 20-25 minutes 
  4. Allow the rice to cool slightly 
  5. In a large skillet add the rice and the mixed vegetables with paneer and mix together taking care not to break the grains of rice

Wednesday, November 14, 2012

Steamed Tofu with Mushrooms


This is an excellent vegetarian dish to make if you want a light meal; packed with bold flavours from ginger and sesame oil. It's easy to make and requires no less than 15 minutes cooking time. I like to serve it on a bed of brown rice and stir fry bok-choy for a good crunch. In this recipe, I use dried shitake mushrooms and black wood ear fungus. If you have never cooked with wood ear fungus, you will love it! It has woody flavour and cruncy texture. It's commonly used in Asian cooking such as salads, stir fries and soups. I usually use silken tofu for steaming as it has soft and velvety texture. Happy Steaming!


Skill Level: Easy
Serves:

INGREDIENTS:
  • 4 dried shitake mushrooms
  • 1 pack (454 g) silken tofu
  • 1 clove garlic, finely minced
  • 1 thumb sized ginger
  • 1 green onion
  • 2 tbsp soy sauce
  • 1/2 tsp sugar
  • 2 tsp sesame oil
  •  
METHOD: 
  1. Soak dried shitake mushrooms and black wood ear fungus in hot boiling water for 20 minutes. Once soft, slice shitake thinly and cut the fungus into bite-sized pieces
  2. Slice ginger into thin julienne strips and slice green onions diagonally 
  3. Meanwhile, cut the tofu into desired thickness and place into heat-proof dishware
  4. In a bowl, mix soy sauce, sugar, sesame oil, shitake and wood ear fungus together 
  5. Layer the tofu with seasoned mushrooms with its sauce, ginger, chopped garlic and green onions
  6. Steam for 10 minutes 
Note: If you do not have a steamer, you can place the tofu in a baking tray, covered with aluminum foil and bake at 350 degree Fahrenheit for 10 to 15 minutes.

Sunday, November 4, 2012

Chaat


Chaat - is a savoury snack that is quite popular in India. Now first things first - how is it 
pronounced ? Not like "chat" as in "I had a serious chat with my sister". It is more like saying the word "chart"without rolling the "r". The intention is certainly not to turn you off from the get go with an instruction in pronunciation. However you choose to say Chaat - this is an easy to make snack that may look intimidating when you see the picture above so allow me to introduce the main players - starting with the bowl with chopped tomatoes and moving clockwise. Coriander mint chutney, packaged sev (available at Indian, stores and in the Ethnic section of most grocery stores, chopped cucumber, chopped coriander, tamarind chutney, boiled potatoes and in the centre is boiled green peas.

Skill Level: Easy

Serves: 4 - 6

INGREDIENTS:
  • 1 English cucumber seeded, peeled and cubed 
  • 2 Roma tomatoes seeded and cubed 
  • 4 medium white potatoes, boiled and cubed
  • 1/2 a bunch of coriander leaves washed and cut
  • 1 cup of dried green peas, soaked overnight and boiled until soft 
  • 1 bag of sev (available at Indian stores) Substitute w/ chinese fried noodles
  • see below for chutney ingredients and recipes

Mint Coriander Chutney :
  • 1 good sized bunch of coriander leaves (2 if the bunch is small)
  • 1/2 cup chopped mint leaves
  • 2 cloves garlic
  • 2 green chilies chopped
  • 1/2 cup unsweetened  dessicated coconut flakes 
  • 1/2 tsp salt
METHOD:
  1. Put all mint coriander chutney ingredients into a blender and grind until well mixed
  2. This chutney can be made ahead and frozen for a month or refrigerated for up to a week
  3. When using this chutney for Chaat, thin it a little by adding 2 Tbsp of plain, unflavoured yogurt. Do not add yogurt to the whole chutney if you plan to freeze the remaining

Tamarind Chutney :
  • 1 cup of tamarind (available at Indian stores)  
  • 2 cup of boiling water 
  • 2 cups of sugar
  • 1 tbsp salt 
  • 1 tsp cumin powder
  • 1 tsp black salt (available at Indian stores) 
  • 1 tsp chili powder
  • 1/2 tsp ginger powder
  • 1/2 tsp black pepper
METHOD:
  1. Put tamarind into a large bowl. Pour boiling water into the bowl. Allow it to stand for 5-10 minutes 
  2. Mash with a potato masher to get the pulp out. You should have a thick sludge that has the consistency of crushed tomatoes Please note that the tamarind has seeds
  3. Strain the mixture,then add sugar and all other ingredients
  4. Mix well
  5. Check and adjust seasoning
  6. This chutney can be refrigerated for up to one month and can be used as a dipping sauce 
TO ASEMBLE THE CHAAT:
  1. This is the fun part. Arrange the ingredients in small bowls and each person can make their own This is how I did it
  2. Put the green peas at the bottom, add some potatoes, then cucumber, tomatoes, coriander, mint chutney and sev. Drizzle with tamarind chutney and enjoy!


Potato Curry


Potato Bhaji is a breakfast dish that is eaten most often with puri. Puris are deep fried rounds of dough that puff up golden and beautiful and then collapse. My mum would fry up these goodies and my siblings and I would eat then almost as fast as she could roll them out and fry them. Today my nieces do the same when my sister makes puri and bhaji. My parents are visiting and mum made this for breakfast this morning. Puri and potato curry is a personal favourite. Puris can also be eaten with kala channa which is dark chickpeas but that is a recipe for another day.
This recipe is for the potato curry, puri recipe to follow.
This recipe has a couple of ingredients that may be new to some readers.
THE FOUR PICTURES BELOW ARE COURTESY OF WIKIPEDIA. 


Urad Dal, also called black gram is a lentil. When it's black husk is removed and the lentil is split it looks like this. It is used to make many dishes but along with mustard and cumin seeds it is also used to temper vegetables.


Dried red chillies and curry leaves shown below are ingredients used when tempering vegetables, usually added to hot oil when onions or mustard seeds are added. Dried red chillies are 
not used to increase pungency, merely to flavour the finished dish.


Skill Level:
 Easy
Serves: 4 - 6

INGREDIENTS:

  • 4 medium sized white potatoes washed peeled and cubed
  • 1 medium sized onion sliced 
  • 1/4 tsp turmeric
  • 1/4 tsp mustard seeds
  • 2 small green chilies cut into small pieces
  • 1 Tbsp chopped ginger  
  • 2 cups of water
  • 1 tsp salt
  • 2 T cooking oil
  • 1 tsp black mustard seeds
  • 1 tsp urad dal
  • 10 curry leaves
  • 3 dried red chilies

METHOD:
  1. Wash potatoes and cut into cubes
  2. Add to a pot water, potatoes, turmeric, salt, ginger and green chilies
  3. Boil until soft but not mushy. Set aside
  4. Heat a saucepan and add cooking oil, when it is hot add dried red chilies and mustard seeds. Mustard seeds will pop, then add curry leaves and finally the urad dal.   This should be done on medium high heat and avoid burning the tempering ingredients to prevent a bitter flavour to the curry
  5. Pour the boiled potato mixture into the tempered ingredients, garnish and serve hot

Stacked Eggplant with Feta Cheese


Eggplant, as I have previously mentioned, is a family favourite, so I was happy to try out a new recipe that was an instant hit. This works well as an appetizer as you can make the eggplant slices ahead of time and assemble the rest of the ingredients just before serving. Enjoy! 

Skill Level: Easy
Serves: 4 - 6
INGREDIENTS:
  • 1 small eggplant that can be cut into  1 inch slices
  • 1 Tbsp whole wheat flour
  • 1/2 tsp cayenne pepper
  • 1/2 tsp salt
  • 1/2 tsp black pepper
  • 1/4 cup cooking oil ( I used sunflower oil)
  • 1 medium onion sliced
  • 1  cup zucchini cubed
  • 1 cup cremini mushrooms sliced
  • 1/4 cup feta cheese grated
  • 1/2 cup cherry tomatoes cut into half 
  • 1/4 cup breadcrumbs
  • 1/4 tsp dried rubbed oregano
  • 2 Tbsp chopped walnuts  

METHOD:

  1. Preheat the oven to 500 F
  2. Season the flour with cayenne and salt and toss eggplant in the mixture and coat both sides
  3. Heat a 2 Tbsp oil and add the eggplant slices and saute eggplant for 3 minutes per side adding more oil as necessary
  4. Set the eggplant aside on a parchment paper lined tray
  5. Heat a tablespoon of oil and saute the onions, mushrooms and zucchini 
  6. Season with salt and pepper. Turn off heat and add tomatoes
  7. Add breadcrumbs and oregano. Taste and adjust seasoning as needed
  8. Divide the vegetable mixture evenly on top of the eggplant slices, sprinkle walnuts and feta over top 
  9. Bake for 5 minutes before serving

Cranberry Lentil Almond Rice


Here is a side I often serve with baked chicken or fish. It is easy to make and on the day you decide to go meatless, it makes for a perfect lunch. Cranberries are a very versatile ingredient and are harvested from September to November which is likely why this fall fruit features in holiday dinners from Thanksgiving to Christmas. I buy bags of it and freeze it; they are perfect to throw into a batch of muffins or my zucchini cranberry bread with the added convenience of using without thawing. In this dish, it partners perfectly with lentils, almonds and rice. For this recipe, I used parboiled rice but you can use any rice you have on hand (the cooking instructions will differ accordingly). Try this with brown rice for extra fibre. 

Skill Level: Easy
Serves: 4
INGREDIENTS:
  • 1 cup of parboiled rice cooked in 1/2 tsp salt
  • 3 cups of boiling water
  • 1 medium onion sliced
  • 1/2  cup dried cranberries 
  • 1/2 cup brown lentils soaked for 1 hour and boiled till soft but not mushy
  • 1/4 cup of slivered almonds 
  • 2 Tbsp live oil (not virgin or extra virgin)
  • 1 vegetable bouillon cube 

 METHOD:
  1. Wash and cook rice for 20 minutes in an uncovered pot. Allow to cool
  2. Saute onions until transparent, add the vegetable bouillon cube
  3. Add the lentils and mix well
  4. Turn off the heat and add the cooled rice and mix 
  5. Sprinkle the cranberries and slivered almonds until combined
  6. Season if necessary

Tuesday, October 30, 2012

Classic Chinese Chow Mein


This classic chow mein only require several main ingredients: noodle, bean sprouts, onion, green onions and seasonings. I love the simplicity of this dish and its flavour should not be undermined. If you want to add in some proteins, you can do so with beef or chicken. The secret of this recipe is similar to the Chinese fried rice. A high heat cooking is required to get the toasty flavour. Thus, I recommend you to lay out all ingredients and seasonings on kitchen counter.

Skill Level: Easy
Serves:

INGREDIENTS:
  • 1 pack (454 g/1 lb) chow mein noodle
  • 3 L water
  • 3 cups bean sprouts
  • 1 bunch green onion, cut into 2" length
  • 3 cloves of garlic, finely chopped
  • 1 onion, sliced
  • 3 tbsp soy sauce 
  • 1 tbsp oyster sauce (for vegetarian option: you can use vegetarian style "oyster" sauce)
  • 1 tbsp dark soy sauce
  • 2 tbsp brown sugar
  • 6 tbsp cooking oil 
  • 4 tbsp water
  • white pepper to taste
  • toasted sesame seeds for garnishing

 METHOD: 
  1. In a pot, boil 3 L of water and cook the noodle for about 2 minutes
  2. Drain and rinse the noodle to wash off starch
  3. In a wok, heat up cooking oil till smoking hot. Add in onion and garlic, cook till golden brown
  4. Stir in green onions and cook for another minute
  5. Add in the noodle, all seasonings and 3 tbsp water, stir until uniform. Cook for 5 to 7 minutes
  6. Lastly, add in bean sprouts and stir for another 2 minutes
  7. Serve with toasted seeds

Monday, October 22, 2012

Miso Soup with Zucchini


Fall is here and the day is getting shorter and colder. Soon, we all know that winter will be more and so on. All I can think of is making a pot of hot and comforting soup. When I checked my pantry and fridge, I found that I had ingredients readily available for a Japanese miso soup.

Traditionally, bonito flakes (fish flakes) are usually used to make the broth in addition to miso paste. However, I use dashi to make the broth to save time. Dashi is an instant Japanese fish stock that is made from kelp and/or fish shavings. It is salty and contributes to umami taste. In case if you want to make a vegetarian style miso soup, then, you can omit dashi and replace with vegetable stock or kelp stock. You can get dried kelp from Japanese or Korean grocery stores. Simply rinse the kelp and boil in a pot of water to make the stock.

There are two types of miso: red and white. Red miso has a much more stronger taste while white miso is sweeter and delicate. When making soup with miso paste, you need to ensure the soup is simmered instead of rolling boiled to retain its flavour.

Skill Level: Easy
Serves: 6 - 8

INGREDIENTS:
  • 1.25 L water
  • 1 1/2 tsp dashi 
  • 1 1/2 tbsp wakame seaweed
  • 1 1/2 tbsp white miso paste
  • 1 pack (300 g) silken tofu
  • 1/2 zucchini, sliced diagonally
  • 1 green onion, chopped finely

 METHOD: 
  1. In a pot, boil water and add in dashi. Turn the heat to low
  2. Cut tofu into small cubes. Add in the wakame seaweed and tofu
  3. In a small bowl, mix miso paste with a ladle of hot broth. Whisk until dissolved
  4. Slowly stir in the miso slurry into the pot
  5. Add in zucchini slices and cook under low heat for another 5 minutes
  6. Serve hot and garnish with green onion

Wednesday, October 17, 2012

Crispy Tofu With Dipping Sauce


This is a recipe that is shared by a friend of mine who came to visit from Australia. She came to visit us two years ago and served this delicious tofu for dinner. Believe me, if you know anyone who does not like tofu, this is a dish that will change their mindset! They are crispy and surprisingly, not even deep fried! They are pan-fried. To those who are health-conscious, you can have the option by spraying them with cooking oil and bake.

Serve this dish as an appetizer with dipping sauce or serve with teriyaki sauce and brown rice for a complete light lunch or dinner.
Skill Level: Easy
Serves:

INGREDIENTS:
  • 1 pack (454 g) medium firm tofu
  • 1 egg
  • 1 cup panko (Japanese bread crumbs)
  • Cooking oil for pan frying 
  •  
    Dipping sauce
  • 2 tbsp soy sauce
  • 2 tbsp water
  • 1/2 tsp rice vinegar
  • 1 tsp sugar
  • few drops of sesame oil
  • 1/4 tsp red pepper flakes 
  • sesame seeds and green onions for garnishing 

 METHOD: 
  1. Break one egg into a small bowl and scramble with a fork
  2. In a separate plate, lay out the panko bread crumbs
  3. Slice tofu 1 cm thick and lay on paper towel to absorb the moisture. Leave for 5 minutes
  4. In a non-stick pot, heat up enough cooking oil for pan frying 
  5. Dip the tofu pieces into the egg wash followed with panko crumbs
  6. Pay fry until golden brown 
  7. For dipping sauce: whisk all ingredients together in a bowl
  8. Serve the tofu hot with dipping sauce as an appetizer. You can also serve the tofu with teriyaki sauce or glaze and serve with rice as a meal

Monday, October 15, 2012

Sambal Telur (Eggs with Spicy Sauce)


A very traditional Indonesian dish which you can find anywhere from street corner to high end Indonesian restaurants. It is commonly served with nasi lemak, nasi campur or nasi tumpeng. Whenever I make this dish, it reminds me of home and my mother. The eggs are hard-boiled and then deep fried. The outer golden crust gives them unique texture. If you love spicy food, this is a must to try! Best to serve with a plate of hot steamed rice.

Skill Level: Between easy and medium
Serves: 4 - 6

INGREDIENTS:
  • 8 eggs, hard boiled
  • 3 shallots, sliced thinly
  • 1/2 tomatoes, roughly chopped
  • 1 cup all-purpose sambal
  • 1/3 cup cooking oil plus enough oil to deep-fry eggs
  • 2 tbsp sugar or brown sugar
  • 1/4 tsp salt

 METHOD: 
  1. In a wok, heat up enough oil to fry the hard boiled eggs 
  2. Once the oil reaches 375 degree Fahrenheit, drop the eggs slowly and stir till golden brown. Leave the eggs aside and drain extra oil on paper towel. 
  3. In a separate cooking pan, heat up 1/3 cup of cooking oil. Add in shallots, cook till brown 
  4. Stir in tomatoes, sambal and cook for 4 minutes
  5. Add in the sugar and salt and stir for another 5 minutes
  6. Serve the eggs with the sauce

Tuesday, September 18, 2012

Salmon with Ginger Infused Teriyaki Glaze

When it comes to making an order at Japanese restaurants, I am always torn between 2 things. Should I order a combo of sushi and sashimi or a teriyaki dish? I love them both yet I won't be able to finish these 2 set of orders. In the end, I always ended up with a bento box as I can get a combination of few pieces of sushi and sashimi and a teriyaki chicken, beef or salmon. 

What makes teriyaki so special? It has a perfect balance of sweet and salty with a hint of ginger. Most of the time, I get disappointment with store-bought teriyaki sauces or glazes. They lack in flavour, overly sweet and thick. Not to mention, they can be expensive as well. You get a bottle from a price range of $2.99 to 5.99 but trust me, if you make your own, you can make plenty of teriyaki sauce with less than 6 dollars. It all takes soy sauce, mirin (Japanese sweet seasoning sauce), ginger, sugar and sake (optional). If you want to make a glaze, you can thicken it with corn starch. Mirin can be easily found in Asian groceries or Asian aisle in local grocery stores such as Loblaws and Canadian Superstore.

Ever since the birth of my son, time has become so valuable that I need to look for simple recipes that do not require hours of cooking in the kitchen. One note though, simple cooking does not mean letting go of flavours. I cannot look further than making a salmon teriyaki. It is simple, fast and easy to make for dinner. This is my version of salmon with teriyaki glaze packed with ginger flavour. I serve it with a bed of stir-fried celery, carrots, zucchinis and onions. You can substitute with your favourite vegetables.


Skill Level: Easy
Serves: 2 but the teriyaki glaze is enough for 4 servings

INGREDIENTS:
  • 2 pieces of salmon fillet or your favourite fish
  • Salt and pepper to taste
  • 1 tbsp cooking oil
  • Green onion and sesame seeds for garnishing
To make teriyaki glaze:
  • 1/4 cup low-sodium soy sauce
  • 2 tbsp mirin
  • 2 tbsp sake (optional)
  • 1 tbsp sugar or brown sugar
  • thumb size ginger, sliced
  • 1 tbsp corn starch and enough water to make a slurry
For vegetables:
  • 1 stalk of celery, sliced diagonally
  • 1 zucchini, sliced diagonally
  • 1 onion, sliced diagonally
  • 1 carrot, sliced
  • Salt and pepper to taste
  • 1 tbsp cooking oil

 METHOD: 
  1. In a non-stick pan, heat up 1 tbsp cooking oil. Season salmon fillet with salt and pepper. Please note, teriyaki glaze has enough sodium so do not oversalt your salmon
  2. Pan fry salmon for 6 minutes each side. Set aside
  3. To make teriyaki glaze: In a small saucepan, combine all teriyaki glaze ingredients with the exception of corn starch. Bring to boil and change to low heat and simmer for another 5 minutes. Add in the corn starch slurry to thicken the sauce. Stir and set aside
  4. For vegetables: In a pan, heat up 1 tbsp cooking oil. Add in onion slices and cook until brown. Stir in all vegetables and season with salt and pepper. Again, do not oversalt your vegetables. Saute for 5 minutes. Set aside
  5.  On a plate, place the vegetables at the bottom followed with salmon fillet. serve warm and drizzle with teriyaki glaze. You can garnish with sesame seeds and green onion

Thursday, September 13, 2012

Sambal Kecap (Indonesian Style Sweet Dipping Sauce)


apologies. I have not got a chance to post new recipes ever since the birth of my son, Baby A. My days have been filled with feeding, changing diapers and taking a nap whenever I get a chance to. By the end of the day, it's all worth it though :). 

This is a recipe of one of my favourite dipping sauces. It's sweet and tangy with a kick of spiciness from Thai hot peppers. The lime juice is refreshing and wakes up all your taste buds. This is a recipe that has been passed down from one generation to another in my family. I like to serve it with fried fish, fried tofu, fried chicken or steamed seafood.

Skill Level: Easy
Serves: N/A

INGREDIENTS:
  • 8 red Thai chili, sliced
  • 6 shallots, sliced thinly
  • 1 lime juice
  • 2 tbsp kecap manis 
  • 1 tbsp water
  • 1 tsp soy sauce 
  • 1 tbsp brown sugar or sugar

 METHOD:  

Mix all ingredients together in a small bowl and refrigerate for 20 to 30 minutes before serve

Thursday, August 16, 2012

Kecap Manis (Indonesian Sweet Soy Sauce)


I received several questions from readers on what kecap manis is. This ingredient is used quite often in my Asian recipes. Well, kecap manis (Ketjap Manis) is an Indonesian sweet soy sauce. Unlike any other soy sauces in the market, this sauce is sweetened with palm sugar and infused with bay leaves and a hint of star anise. It's thick just like molasses and can be stored in your pantry indefinitely.

When I first moved to Canada 10 years ago to pursue my studies, I did not expect to find kecap manis sold in Canada. So I packed bottles of kecap manis in my suitcase in case I was homesick and missed eating something familiar. Surprisingly enough, kecap manis was easily found in most Asian grocery stores and my emergency supply was not even that valuable anymore! Lately, I also notice other local grocery stores such as Loblaws, Canadian Superstore and Metro also have this sauce in their international aisle. There are 2 famous brands that are offered: ABC or Bango brand. Personally, I prefer Bango brand to ABC as it's less sweet.

I have also been noticing several cook books that use "kecap manis" in their recipes, particularly when it comes to Malaysian, Thai and Indonesian recipes. In Indonesia, it is commonly used in nasi goreng (fried rice), mee goreng (fried noodle), stews, soups and dipping sauces. For Javanese, they also like to drizzle kecap manis on their chicken or beef satays.

In case you cannot find kecap manis in your area, then, you can substitute with low sodium soy sauce and add brown sugar to sweeten the sauce. However, it may not have exactly as the flavour kecap manis delivers.


Monday, August 6, 2012

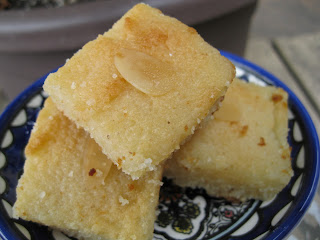
Semolina Cake


I am always on the lookout for simple eggless desserts that can be enjoyed by my vegetarian friends and Semolina cake is one such treat. Very simple to make and delicious, it can be baked in the evenings when the temperatures go down and can be stored in an airtight container in the refrigerator for up to a week. Leave it at room temperature before serving.

Skill level : Very easy
Serves - 8-10

INGREDIENTS:


  • 2 cups semolina (cream of wheat)
  • 1/2 cup butter softened at room temperature 
  • 1 cup yogurt (do not use 0% fat)
  • 1/2 teaspoon baking powder
  • Sliced almonds
Sugar Syrup:
  • 3 cups sugar
  • 11/2 cups water
  • Juice of 11/2 lemons
  • 1 Tablespoon rose water (optional)

METHOD:

  1. Preheat oven to 350 F, grease a lasagna pan and set aside.
  2. Add sugar and water to a pan and heat until it comes to a simmer. Allow it to cool, add rose water and set aside.
  3. In a bowl, add semolina, yogurt, baking powder and butter and mix well.
  4. Add 1/2 a cup of the sugar syrup to the batter and mix.
  5. Pour batter into the pan,using a knife score into squares and press a sliced almond into the dough and bake for 30 minutes. 
  6. Remove the pan from the oven and add another 1/2 cup of the syrup and bake for an additional 10 minutes.
  7. Turn off the oven, remove the pan, pour another 1/2 cup of syrup onto the cake and put it back in the (turned off) oven for an additional 5-7 minutes.

Sunday, August 5, 2012

Chocolate Coconut Squares


August long weekend - Simcoe Day is upon us and my blog partner and her husband are days away from welcoming their first baby into 'our' lives. While we are still unsure about the gender of this new baby, one thing we can be sure about is the fact that another foodie is on its way. We had a small get together as we count down to the little one arriving and it coincided with what was surely the hottest day we've had in weeks. High temperatures with humidity making it feel like 41 + degrees C,forced us to eat inside but we finally braved the weather  and sat outside (with a fan to keep mom and junior cool) and had coffee and dessert. This simple dessert can be made the day ahead and stored for up to a week or less depending on how much your guests enjoy it.

Skill level : Very easy
Serves : 6-8

INGREDIENTS:

  • 11/2 cups graham cracker crumbs
  • 1/2 cup unsalted butter
  • 1/4 cup sugar
  • 1 cup unsweetened dessicated coconut
  • 1 cup semi sweet chocolate chips
  • 1 cup chopped walnut 
  • 1 can (300 mL) sweetened condensed milk

METHOD:

  1.  Preheat oven to 350 F, grease a glass lasagna pan and set aside.
  2. Heat butter in a small pan, add graham cracker crumbs and sugar and mix.
  3. Press the heated cookie crumbs into the base of the pan, sprinkle coconut till it covers the crumbs completely.
  4. Next put the chocolate chips over the coconut, pour condensed milk over the chocolate (I used only 3/4 of the can)
  5. Lastly sprinkle walnut pieces to cover the entire surface
  6. Bake for 35-40 minutes, allow it to cool before cutting it into squares.
  7. I sometimes add the whole can of condensed milk and then add a cup of dried cranberries to get a sweet and tart flavour that goes well with chocolate.

Tuesday, July 31, 2012

Spicy Sweet Potato Leaves


How many of us have ever heard that sweet potato leaves are edible? In South East Asia, this is our regular kind of vegetable. Yes, they are edible, yummy and taste just like kangkung (water spinach).

In Toronto, sweet potato leaves can be easily found in Chinese grocery stores but they are not cheap. They cost around 3 dollars per pound. Last summer, my husband and I planted sweet potatoes in our backyard so we could indulge as much as we like. The leaves grow just like vines!. They can be stir fried, cooked with pumpkin in a curry sauce and so much more. I like to stir fry the leaves just like my mother does back home. I sauté them with preserved soy beans, dried shrimps and hot sauce....all packed with Indonesian flavour!

Skill Level: Easy
Serves: 4 - 5

INGREDIENTS:
  • 2 lbs sweet potato leaves
  • 1 onion, sliced thinly
  • 1 garlic clove, minced
  • 2 tbsp dried shrimps, soaked for 10 minutes
  • 2 tbsp preserved soy beans (tauco)
  • 2 tbsp all-purpose sambal
  • 3 tbsp cooking oil
  • 1/4 cup water

 METHOD: 
  1. Strip the sweet potato leaves with its stem from tough, woody branches. Rinse well
  2. In a wok, heat up the cooking oil until smoking. Add in sliced onions and garlic and stir until golden brown
  3. Mix in dried shrimps, preserved soy beans and all purpose sambal. Stir for another minute
  4. Add in the sweet potato leaves and cook for several minutes until they are half wilted
  5. Mix in water, taste. If not salty enough, you can add in dashes of fish sauce according to your taste. Keep stirring the ingredients for another 5 minutes
  6. Dish out and serve warm with steamed rice

Monday, July 9, 2012

Jamaican Style Rice N' Peas


A lot of nutrition research and articles find that North Americans, in general, do not consume enough beans or legumes in their diet. Beans or legumes are known to be a good source of protein and dietary fibre. Unfortunately, they can also be perceived as boring, bland and flavourless. 

Besides adding beans in my soup and salad, I sometimes like to serve them with rice as a side dish. Jamaican Style Rice N' Peas is one of the examples. The rice is fluffy, light and flavoured with thyme and coconut milk. This is an excellent side to our Jamaican Inspired Jerk Chicken.

Skill Level: Easy
Serves: 4 - 5

INGREDIENTS:
  • 2 cups parboiled rice
  • 1 can (540 mL) red kidney beans
  • 1 cup coconut milk
  • 3 cups water
  • 1 Scotch Bonnet pepper
  • 1 tsp thyme
  • 2 tbsp cooking oil
  • 1 tsp salt
  • 1 clove of garlic
  • 1 bay leaf

 METHOD: 
  1. In a non-stick pot, heat up 2 tbsp cooking oil and dry garlic until light brown 
  2. Add in parboiled rice, stir for 2 minutes under medium heat for a nice toasted colour 
  3. Drain red kidney beans and rinse with water. Add into the pot and stir for a minute
  4. Add in the remaining of ingredients, stir. Cover and let it boil
  5. Lower the heat and cook for another 20 minutes, covered
  6. Turn off the heat and let the rice sit for 5 minutes
  7. Fluff the rice with a  fork and serve hot