Sunday, November 4, 2012

Cranberry Lentil Almond Rice


Here is a side I often serve with baked chicken or fish. It is easy to make and on the day you decide to go meatless, it makes for a perfect lunch. Cranberries are a very versatile ingredient and are harvested from September to November which is likely why this fall fruit features in holiday dinners from Thanksgiving to Christmas. I buy bags of it and freeze it; they are perfect to throw into a batch of muffins or my zucchini cranberry bread with the added convenience of using without thawing. In this dish, it partners perfectly with lentils, almonds and rice. For this recipe, I used parboiled rice but you can use any rice you have on hand (the cooking instructions will differ accordingly). Try this with brown rice for extra fibre. 

Skill Level: Easy
Serves: 4
INGREDIENTS:
  • 1 cup of parboiled rice cooked in 1/2 tsp salt
  • 3 cups of boiling water
  • 1 medium onion sliced
  • 1/2  cup dried cranberries 
  • 1/2 cup brown lentils soaked for 1 hour and boiled till soft but not mushy
  • 1/4 cup of slivered almonds 
  • 2 Tbsp live oil (not virgin or extra virgin)
  • 1 vegetable bouillon cube 

 METHOD:
  1. Wash and cook rice for 20 minutes in an uncovered pot. Allow to cool
  2. Saute onions until transparent, add the vegetable bouillon cube
  3. Add the lentils and mix well
  4. Turn off the heat and add the cooled rice and mix 
  5. Sprinkle the cranberries and slivered almonds until combined
  6. Season if necessary

Tuesday, October 30, 2012

Classic Chinese Chow Mein


This classic chow mein only require several main ingredients: noodle, bean sprouts, onion, green onions and seasonings. I love the simplicity of this dish and its flavour should not be undermined. If you want to add in some proteins, you can do so with beef or chicken. The secret of this recipe is similar to the Chinese fried rice. A high heat cooking is required to get the toasty flavour. Thus, I recommend you to lay out all ingredients and seasonings on kitchen counter.

Skill Level: Easy
Serves:

INGREDIENTS:
  • 1 pack (454 g/1 lb) chow mein noodle
  • 3 L water
  • 3 cups bean sprouts
  • 1 bunch green onion, cut into 2" length
  • 3 cloves of garlic, finely chopped
  • 1 onion, sliced
  • 3 tbsp soy sauce 
  • 1 tbsp oyster sauce (for vegetarian option: you can use vegetarian style "oyster" sauce)
  • 1 tbsp dark soy sauce
  • 2 tbsp brown sugar
  • 6 tbsp cooking oil 
  • 4 tbsp water
  • white pepper to taste
  • toasted sesame seeds for garnishing

 METHOD: 
  1. In a pot, boil 3 L of water and cook the noodle for about 2 minutes
  2. Drain and rinse the noodle to wash off starch
  3. In a wok, heat up cooking oil till smoking hot. Add in onion and garlic, cook till golden brown
  4. Stir in green onions and cook for another minute
  5. Add in the noodle, all seasonings and 3 tbsp water, stir until uniform. Cook for 5 to 7 minutes
  6. Lastly, add in bean sprouts and stir for another 2 minutes
  7. Serve with toasted seeds

Monday, October 22, 2012

Miso Soup with Zucchini


Fall is here and the day is getting shorter and colder. Soon, we all know that winter will be more and so on. All I can think of is making a pot of hot and comforting soup. When I checked my pantry and fridge, I found that I had ingredients readily available for a Japanese miso soup.

Traditionally, bonito flakes (fish flakes) are usually used to make the broth in addition to miso paste. However, I use dashi to make the broth to save time. Dashi is an instant Japanese fish stock that is made from kelp and/or fish shavings. It is salty and contributes to umami taste. In case if you want to make a vegetarian style miso soup, then, you can omit dashi and replace with vegetable stock or kelp stock. You can get dried kelp from Japanese or Korean grocery stores. Simply rinse the kelp and boil in a pot of water to make the stock.

There are two types of miso: red and white. Red miso has a much more stronger taste while white miso is sweeter and delicate. When making soup with miso paste, you need to ensure the soup is simmered instead of rolling boiled to retain its flavour.

Skill Level: Easy
Serves: 6 - 8

INGREDIENTS:
  • 1.25 L water
  • 1 1/2 tsp dashi 
  • 1 1/2 tbsp wakame seaweed
  • 1 1/2 tbsp white miso paste
  • 1 pack (300 g) silken tofu
  • 1/2 zucchini, sliced diagonally
  • 1 green onion, chopped finely

 METHOD: 
  1. In a pot, boil water and add in dashi. Turn the heat to low
  2. Cut tofu into small cubes. Add in the wakame seaweed and tofu
  3. In a small bowl, mix miso paste with a ladle of hot broth. Whisk until dissolved
  4. Slowly stir in the miso slurry into the pot
  5. Add in zucchini slices and cook under low heat for another 5 minutes
  6. Serve hot and garnish with green onion

Wednesday, October 17, 2012

Crispy Tofu With Dipping Sauce


This is a recipe that is shared by a friend of mine who came to visit from Australia. She came to visit us two years ago and served this delicious tofu for dinner. Believe me, if you know anyone who does not like tofu, this is a dish that will change their mindset! They are crispy and surprisingly, not even deep fried! They are pan-fried. To those who are health-conscious, you can have the option by spraying them with cooking oil and bake.

Serve this dish as an appetizer with dipping sauce or serve with teriyaki sauce and brown rice for a complete light lunch or dinner.
Skill Level: Easy
Serves:

INGREDIENTS:
  • 1 pack (454 g) medium firm tofu
  • 1 egg
  • 1 cup panko (Japanese bread crumbs)
  • Cooking oil for pan frying 
  •  
    Dipping sauce
  • 2 tbsp soy sauce
  • 2 tbsp water
  • 1/2 tsp rice vinegar
  • 1 tsp sugar
  • few drops of sesame oil
  • 1/4 tsp red pepper flakes 
  • sesame seeds and green onions for garnishing 

 METHOD: 
  1. Break one egg into a small bowl and scramble with a fork
  2. In a separate plate, lay out the panko bread crumbs
  3. Slice tofu 1 cm thick and lay on paper towel to absorb the moisture. Leave for 5 minutes
  4. In a non-stick pot, heat up enough cooking oil for pan frying 
  5. Dip the tofu pieces into the egg wash followed with panko crumbs
  6. Pay fry until golden brown 
  7. For dipping sauce: whisk all ingredients together in a bowl
  8. Serve the tofu hot with dipping sauce as an appetizer. You can also serve the tofu with teriyaki sauce or glaze and serve with rice as a meal

Monday, October 15, 2012

Sambal Telur (Eggs with Spicy Sauce)


A very traditional Indonesian dish which you can find anywhere from street corner to high end Indonesian restaurants. It is commonly served with nasi lemak, nasi campur or nasi tumpeng. Whenever I make this dish, it reminds me of home and my mother. The eggs are hard-boiled and then deep fried. The outer golden crust gives them unique texture. If you love spicy food, this is a must to try! Best to serve with a plate of hot steamed rice.

Skill Level: Between easy and medium
Serves: 4 - 6

INGREDIENTS:
  • 8 eggs, hard boiled
  • 3 shallots, sliced thinly
  • 1/2 tomatoes, roughly chopped
  • 1 cup all-purpose sambal
  • 1/3 cup cooking oil plus enough oil to deep-fry eggs
  • 2 tbsp sugar or brown sugar
  • 1/4 tsp salt

 METHOD: 
  1. In a wok, heat up enough oil to fry the hard boiled eggs 
  2. Once the oil reaches 375 degree Fahrenheit, drop the eggs slowly and stir till golden brown. Leave the eggs aside and drain extra oil on paper towel. 
  3. In a separate cooking pan, heat up 1/3 cup of cooking oil. Add in shallots, cook till brown 
  4. Stir in tomatoes, sambal and cook for 4 minutes
  5. Add in the sugar and salt and stir for another 5 minutes
  6. Serve the eggs with the sauce

Tuesday, September 18, 2012

Salmon with Ginger Infused Teriyaki Glaze

When it comes to making an order at Japanese restaurants, I am always torn between 2 things. Should I order a combo of sushi and sashimi or a teriyaki dish? I love them both yet I won't be able to finish these 2 set of orders. In the end, I always ended up with a bento box as I can get a combination of few pieces of sushi and sashimi and a teriyaki chicken, beef or salmon. 

What makes teriyaki so special? It has a perfect balance of sweet and salty with a hint of ginger. Most of the time, I get disappointment with store-bought teriyaki sauces or glazes. They lack in flavour, overly sweet and thick. Not to mention, they can be expensive as well. You get a bottle from a price range of $2.99 to 5.99 but trust me, if you make your own, you can make plenty of teriyaki sauce with less than 6 dollars. It all takes soy sauce, mirin (Japanese sweet seasoning sauce), ginger, sugar and sake (optional). If you want to make a glaze, you can thicken it with corn starch. Mirin can be easily found in Asian groceries or Asian aisle in local grocery stores such as Loblaws and Canadian Superstore.

Ever since the birth of my son, time has become so valuable that I need to look for simple recipes that do not require hours of cooking in the kitchen. One note though, simple cooking does not mean letting go of flavours. I cannot look further than making a salmon teriyaki. It is simple, fast and easy to make for dinner. This is my version of salmon with teriyaki glaze packed with ginger flavour. I serve it with a bed of stir-fried celery, carrots, zucchinis and onions. You can substitute with your favourite vegetables.


Skill Level: Easy
Serves: 2 but the teriyaki glaze is enough for 4 servings

INGREDIENTS:
  • 2 pieces of salmon fillet or your favourite fish
  • Salt and pepper to taste
  • 1 tbsp cooking oil
  • Green onion and sesame seeds for garnishing
To make teriyaki glaze:
  • 1/4 cup low-sodium soy sauce
  • 2 tbsp mirin
  • 2 tbsp sake (optional)
  • 1 tbsp sugar or brown sugar
  • thumb size ginger, sliced
  • 1 tbsp corn starch and enough water to make a slurry
For vegetables:
  • 1 stalk of celery, sliced diagonally
  • 1 zucchini, sliced diagonally
  • 1 onion, sliced diagonally
  • 1 carrot, sliced
  • Salt and pepper to taste
  • 1 tbsp cooking oil

 METHOD: 
  1. In a non-stick pan, heat up 1 tbsp cooking oil. Season salmon fillet with salt and pepper. Please note, teriyaki glaze has enough sodium so do not oversalt your salmon
  2. Pan fry salmon for 6 minutes each side. Set aside
  3. To make teriyaki glaze: In a small saucepan, combine all teriyaki glaze ingredients with the exception of corn starch. Bring to boil and change to low heat and simmer for another 5 minutes. Add in the corn starch slurry to thicken the sauce. Stir and set aside
  4. For vegetables: In a pan, heat up 1 tbsp cooking oil. Add in onion slices and cook until brown. Stir in all vegetables and season with salt and pepper. Again, do not oversalt your vegetables. Saute for 5 minutes. Set aside
  5.  On a plate, place the vegetables at the bottom followed with salmon fillet. serve warm and drizzle with teriyaki glaze. You can garnish with sesame seeds and green onion

Thursday, September 13, 2012

Sambal Kecap (Indonesian Style Sweet Dipping Sauce)


apologies. I have not got a chance to post new recipes ever since the birth of my son, Baby A. My days have been filled with feeding, changing diapers and taking a nap whenever I get a chance to. By the end of the day, it's all worth it though :). 

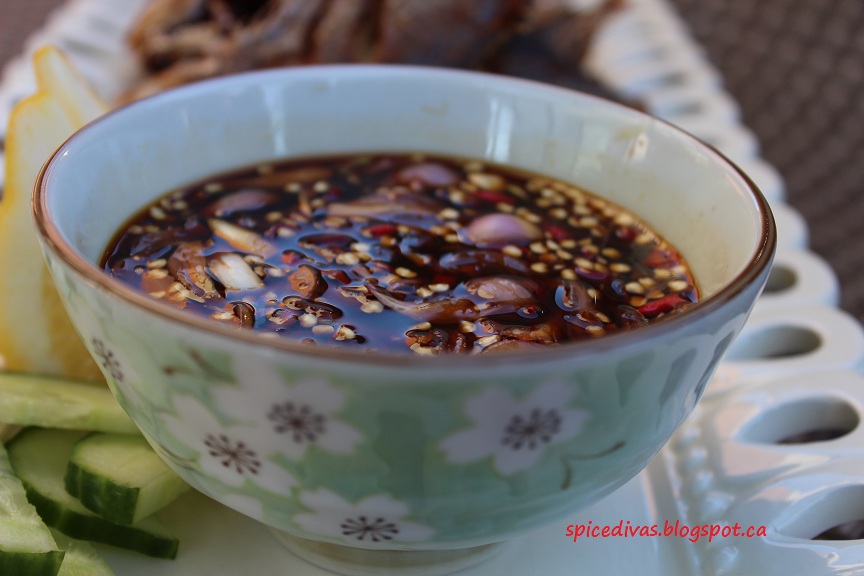
This is a recipe of one of my favourite dipping sauces. It's sweet and tangy with a kick of spiciness from Thai hot peppers. The lime juice is refreshing and wakes up all your taste buds. This is a recipe that has been passed down from one generation to another in my family. I like to serve it with fried fish, fried tofu, fried chicken or steamed seafood.

Skill Level: Easy
Serves: N/A

INGREDIENTS:
  • 8 red Thai chili, sliced
  • 6 shallots, sliced thinly
  • 1 lime juice
  • 2 tbsp kecap manis 
  • 1 tbsp water
  • 1 tsp soy sauce 
  • 1 tbsp brown sugar or sugar

 METHOD:  

Mix all ingredients together in a small bowl and refrigerate for 20 to 30 minutes before serve

Thursday, August 16, 2012

Kecap Manis (Indonesian Sweet Soy Sauce)


I received several questions from readers on what kecap manis is. This ingredient is used quite often in my Asian recipes. Well, kecap manis (Ketjap Manis) is an Indonesian sweet soy sauce. Unlike any other soy sauces in the market, this sauce is sweetened with palm sugar and infused with bay leaves and a hint of star anise. It's thick just like molasses and can be stored in your pantry indefinitely.

When I first moved to Canada 10 years ago to pursue my studies, I did not expect to find kecap manis sold in Canada. So I packed bottles of kecap manis in my suitcase in case I was homesick and missed eating something familiar. Surprisingly enough, kecap manis was easily found in most Asian grocery stores and my emergency supply was not even that valuable anymore! Lately, I also notice other local grocery stores such as Loblaws, Canadian Superstore and Metro also have this sauce in their international aisle. There are 2 famous brands that are offered: ABC or Bango brand. Personally, I prefer Bango brand to ABC as it's less sweet.

I have also been noticing several cook books that use "kecap manis" in their recipes, particularly when it comes to Malaysian, Thai and Indonesian recipes. In Indonesia, it is commonly used in nasi goreng (fried rice), mee goreng (fried noodle), stews, soups and dipping sauces. For Javanese, they also like to drizzle kecap manis on their chicken or beef satays.

In case you cannot find kecap manis in your area, then, you can substitute with low sodium soy sauce and add brown sugar to sweeten the sauce. However, it may not have exactly as the flavour kecap manis delivers.


Monday, August 6, 2012

Semolina Cake


I am always on the lookout for simple eggless desserts that can be enjoyed by my vegetarian friends and Semolina cake is one such treat. Very simple to make and delicious, it can be baked in the evenings when the temperatures go down and can be stored in an airtight container in the refrigerator for up to a week. Leave it at room temperature before serving.

Skill level : Very easy
Serves - 8-10

INGREDIENTS:


  • 2 cups semolina (cream of wheat)
  • 1/2 cup butter softened at room temperature 
  • 1 cup yogurt (do not use 0% fat)
  • 1/2 teaspoon baking powder
  • Sliced almonds
Sugar Syrup:
  • 3 cups sugar
  • 11/2 cups water
  • Juice of 11/2 lemons
  • 1 Tablespoon rose water (optional)

METHOD:

  1. Preheat oven to 350 F, grease a lasagna pan and set aside.
  2. Add sugar and water to a pan and heat until it comes to a simmer. Allow it to cool, add rose water and set aside.
  3. In a bowl, add semolina, yogurt, baking powder and butter and mix well.
  4. Add 1/2 a cup of the sugar syrup to the batter and mix.
  5. Pour batter into the pan,using a knife score into squares and press a sliced almond into the dough and bake for 30 minutes. 
  6. Remove the pan from the oven and add another 1/2 cup of the syrup and bake for an additional 10 minutes.
  7. Turn off the oven, remove the pan, pour another 1/2 cup of syrup onto the cake and put it back in the (turned off) oven for an additional 5-7 minutes.

Sunday, August 5, 2012

Chocolate Coconut Squares


August long weekend - Simcoe Day is upon us and my blog partner and her husband are days away from welcoming their first baby into 'our' lives. While we are still unsure about the gender of this new baby, one thing we can be sure about is the fact that another foodie is on its way. We had a small get together as we count down to the little one arriving and it coincided with what was surely the hottest day we've had in weeks. High temperatures with humidity making it feel like 41 + degrees C,forced us to eat inside but we finally braved the weather  and sat outside (with a fan to keep mom and junior cool) and had coffee and dessert. This simple dessert can be made the day ahead and stored for up to a week or less depending on how much your guests enjoy it.

Skill level : Very easy
Serves : 6-8

INGREDIENTS:

  • 11/2 cups graham cracker crumbs
  • 1/2 cup unsalted butter
  • 1/4 cup sugar
  • 1 cup unsweetened dessicated coconut
  • 1 cup semi sweet chocolate chips
  • 1 cup chopped walnut 
  • 1 can (300 mL) sweetened condensed milk

METHOD:

  1.  Preheat oven to 350 F, grease a glass lasagna pan and set aside.
  2. Heat butter in a small pan, add graham cracker crumbs and sugar and mix.
  3. Press the heated cookie crumbs into the base of the pan, sprinkle coconut till it covers the crumbs completely.
  4. Next put the chocolate chips over the coconut, pour condensed milk over the chocolate (I used only 3/4 of the can)
  5. Lastly sprinkle walnut pieces to cover the entire surface
  6. Bake for 35-40 minutes, allow it to cool before cutting it into squares.
  7. I sometimes add the whole can of condensed milk and then add a cup of dried cranberries to get a sweet and tart flavour that goes well with chocolate.